
Z31/wheelstudreplacement php: Difference between revisions
CleanupBot (talk | contribs) Residue cleanup: re-convert body verbatim from archived source; removes duplicated copy of body; restores list/table structure flattened by import |
CleanupBot (talk | contribs) m Rewrite 14 dev.z31library.com link(s) to z31library.com |
||
| Line 1: | Line 1: | ||
{{ImportedFrom|site=Xenonzcar|title=Z31 Wheel Stud Replacement|url=https:// | {{ImportedFrom|site=Xenonzcar|title=Z31 Wheel Stud Replacement|url=https://z31library.com/xenonzcar_archive/z31/wheelstudreplacement.php.html|archive=https://z31library.com/xenonzcar_archive/z31/wheelstudreplacement.php.html|fetched=2026-05-15}} | ||
== Z31 Wheel Stud Replacement == | == Z31 Wheel Stud Replacement == | ||
https:// | https://z31library.com/xenonzcar_archive/z31/images/Wheelstudreplacement/step1.jpg | ||
So, you go to take off your wheel to rotate your tires or change your brakes. You start to loosen the lug nuts and you hear SNAP and the lugnut falls off. You look and the wheel stud just broke off. Here is how you fix this. | So, you go to take off your wheel to rotate your tires or change your brakes. You start to loosen the lug nuts and you hear SNAP and the lugnut falls off. You look and the wheel stud just broke off. Here is how you fix this. | ||
| Line 35: | Line 35: | ||
# Loosen the wheel lugs. Do not take them off yet. | # Loosen the wheel lugs. Do not take them off yet. | ||
# Jack the car up at the correct jacking point and secure the car on jackstands. | # Jack the car up at the correct jacking point and secure the car on jackstands. | ||
# Remove the lug nuts and take off the wheel.<br /> https:// | # Remove the lug nuts and take off the wheel.<br /> https://z31library.com/xenonzcar_archive/z31/images/Wheelstudreplacement/step2.png | ||
# Remove the 17mm bolts from the rear brake caliper and hang the caliper with a rope or wire, keeping the weight off the rubber brake line. | # Remove the 17mm bolts from the rear brake caliper and hang the caliper with a rope or wire, keeping the weight off the rubber brake line. | ||
# Pull off the rear brake rotor. If it is stuck, tap it loose with a rubber mallet.<br /> https:// | # Pull off the rear brake rotor. If it is stuck, tap it loose with a rubber mallet.<br /> https://z31library.com/xenonzcar_archive/z31/images/Wheelstudreplacement/step3.png | ||
# Using a hammer and punch, knock the broken stud out of the stub axle from the front to rear.<br /> <br /> https:// | # Using a hammer and punch, knock the broken stud out of the stub axle from the front to rear.<br /> <br /> https://z31library.com/xenonzcar_archive/z31/images/Wheelstudreplacement/step4.png https://z31library.com/xenonzcar_archive/z31/images/Wheelstudreplacement/005.png https://z31library.com/xenonzcar_archive/z31/images/Wheelstudreplacement/007.png | ||
# Install the new stud from the rear of the stub axle. Use a nut to pull the stud into the stub axle to the correct location.<br /> <br /> https:// | # Install the new stud from the rear of the stub axle. Use a nut to pull the stud into the stub axle to the correct location.<br /> <br /> https://z31library.com/xenonzcar_archive/z31/images/Wheelstudreplacement/010.png https://z31library.com/xenonzcar_archive/z31/images/Wheelstudreplacement/012.png | ||
# Reinstall the wheel and lower the car. | # Reinstall the wheel and lower the car. | ||
| Line 49: | Line 49: | ||
# Jack the car up at the correct jacking point and secure the car on jackstands. | # Jack the car up at the correct jacking point and secure the car on jackstands. | ||
# Remove the lug nuts and take off the wheel. | # Remove the lug nuts and take off the wheel. | ||
# Remove the 17mm bolts from the brake caliper and hang the caliper with a rope or wire, keeping the weight off the rubber brake line.<br /> https:// | # Remove the 17mm bolts from the brake caliper and hang the caliper with a rope or wire, keeping the weight off the rubber brake line.<br /> https://z31library.com/xenonzcar_archive/z31/images/front%20strut/CaliperRemoval.jpg | ||
# Remove the hub dust cap, cotter pin, and then remove the hub spindle nut.<br /> https:// | # Remove the hub dust cap, cotter pin, and then remove the hub spindle nut.<br /> https://z31library.com/xenonzcar_archive/z31/images/front%20strut/hubexploded.png | ||
# Remove the hub assembly and take it to a workbench.<br /> https:// | # Remove the hub assembly and take it to a workbench.<br /> https://z31library.com/xenonzcar_archive/z31/images/front%20strut/hubremoval.png | ||
# Using a hammer and punch, knock the broken stud out of the hub from the front to rear.<br /> https:// | # Using a hammer and punch, knock the broken stud out of the hub from the front to rear.<br /> https://z31library.com/xenonzcar_archive/z31/images/front%20strut/rotor2.png 1984-1986 style front hub shown | ||
# Install the new stud from the rear of the hub. Use a nut to pull the stud into the hub to the correct location. | # Install the new stud from the rear of the hub. Use a nut to pull the stud into the hub to the correct location. | ||
# Check your bearings while you have the hub off and repack with grease if needed. | # Check your bearings while you have the hub off and repack with grease if needed. | ||
Latest revision as of 22:55, 20 October 2026
Imported page. This page was converted from an archived copy of "Z31 Wheel Stud Replacement" (Xenonzcar, fetched 2026-05-15). The conversion was mechanical, so tables, links and formatting may contain conversion artefacts. Compare against the archived copy if something looks wrong. The content belongs to its original authors.
Z31 Wheel Stud Replacement[edit]
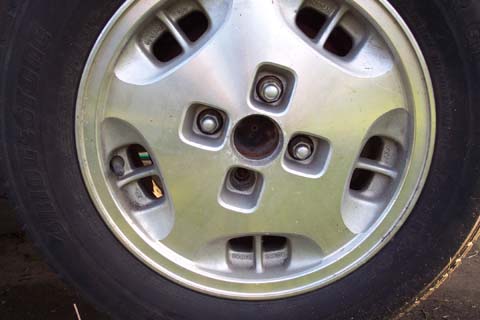
So, you go to take off your wheel to rotate your tires or change your brakes. You start to loosen the lug nuts and you hear SNAP and the lugnut falls off. You look and the wheel stud just broke off. Here is how you fix this.
- WARNING* - Do this modification at your own risk. We Are not responsable for any issues of your own doing.
Items Needed[edit]
Parts & Tools Needed[edit]
- Front Wheel Stud for 1984-1986 Non-turbo and turbo (Nissan part # 40222-Z31001)
- Front Wheel Stud for 1987-1989 Non-Turbo (Nissan part # 43222-Z31001)
- Front Wheel Stud for 1987-1989 Turbo (Nissan part # 43222-Z31005)
- Rear Wheel Stud (Nissan part # 43222-Z31006)
- Lug wrench
- Jack
- Jackstands
- Ratchet set
- A few washers
- Open ended Lug nut (Nissan Part # 40224-Z31001)
- PB Blaster
- Hammer
- Punch
Rear Replacement[edit]
- Loosen the wheel lugs. Do not take them off yet.
- Jack the car up at the correct jacking point and secure the car on jackstands.
- Remove the lug nuts and take off the wheel.
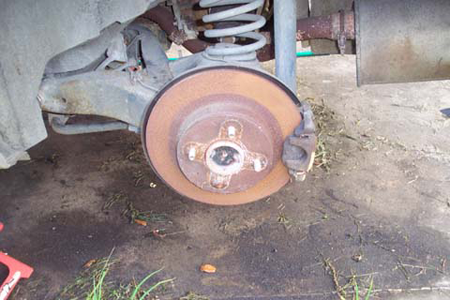
- Remove the 17mm bolts from the rear brake caliper and hang the caliper with a rope or wire, keeping the weight off the rubber brake line.
- Pull off the rear brake rotor. If it is stuck, tap it loose with a rubber mallet.
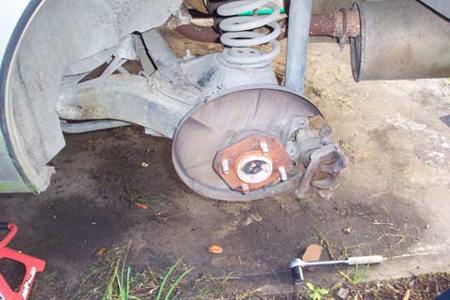
- Using a hammer and punch, knock the broken stud out of the stub axle from the front to rear.
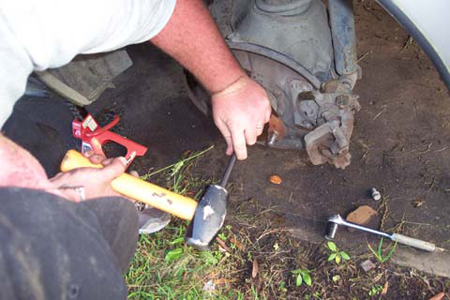
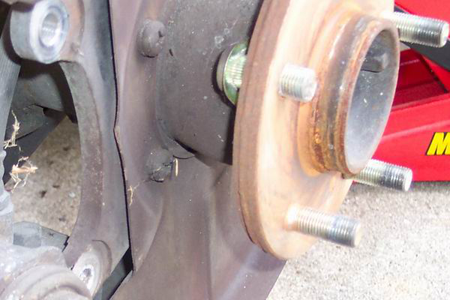
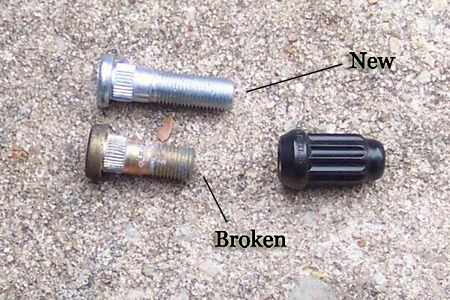
- Install the new stud from the rear of the stub axle. Use a nut to pull the stud into the stub axle to the correct location.
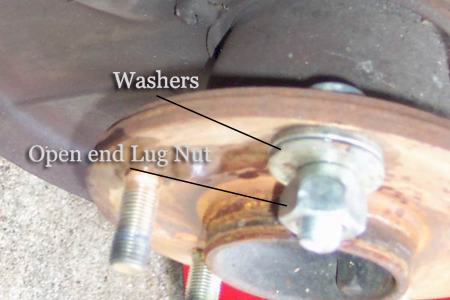
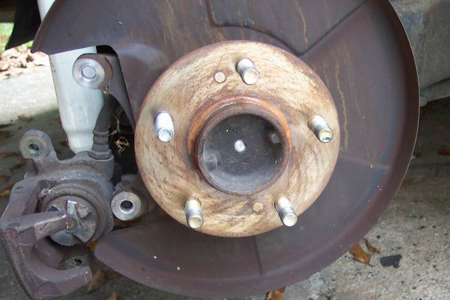
- Reinstall the wheel and lower the car.
Front Replacement[edit]
The front studs are also fairly easy to replace. To replace them, follow the following steps.
- Loosen the wheel lugs. Do not take them off yet.
- Jack the car up at the correct jacking point and secure the car on jackstands.
- Remove the lug nuts and take off the wheel.
- Remove the 17mm bolts from the brake caliper and hang the caliper with a rope or wire, keeping the weight off the rubber brake line.
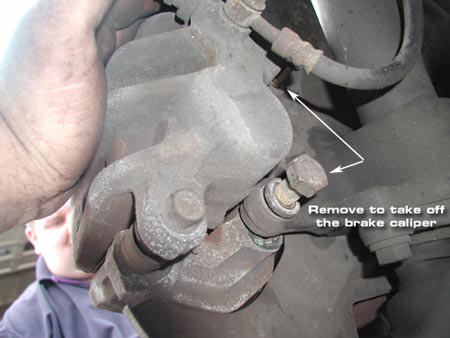
- Remove the hub dust cap, cotter pin, and then remove the hub spindle nut.
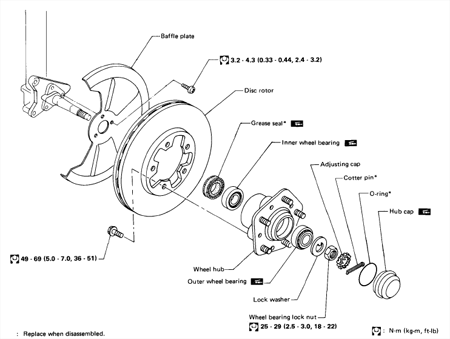
- Remove the hub assembly and take it to a workbench.
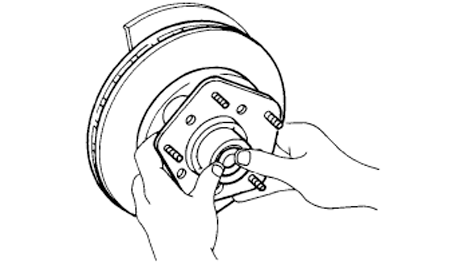
- Using a hammer and punch, knock the broken stud out of the hub from the front to rear.
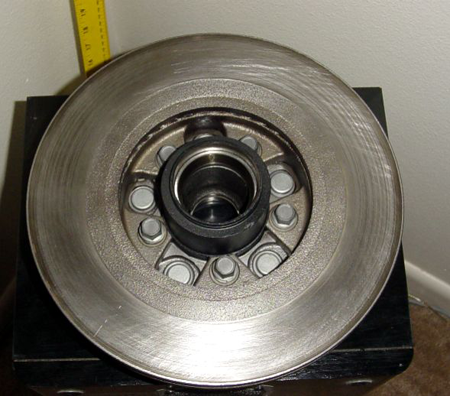 1984-1986 style front hub shown
- Install the new stud from the rear of the hub. Use a nut to pull the stud into the hub to the correct location.
- Check your bearings while you have the hub off and repack with grease if needed.
- Reinstall the hub onto the spindle and torque the hub nut to 18 to 22 ft-lbs.
- Reinstall the wheel and lower the car.
Sources Used[edit]
- 1984-1988 Nissan 300ZX Factory Service Manual
- Write up by: Redare