
Z31/hotairfromac php: Difference between revisions
CleanupBot (talk | contribs) Residue cleanup: re-convert body verbatim from archived source; restores 2 dropped text blocks |
CleanupBot (talk | contribs) Rewrite 15 dev.z31library.com link(s) to z31library.com |
||
| Line 1: | Line 1: | ||
{{ImportedFrom|site=Xenonzcar|title=Z31 Getting Hot Air From AC even when set to cold temps|url=https:// | {{ImportedFrom|site=Xenonzcar|title=Z31 Getting Hot Air From AC even when set to cold temps|url=https://z31library.com/xenonzcar_archive/z31/hotairfromac.php.html|archive=https://z31library.com/xenonzcar_archive/z31/hotairfromac.php.html|fetched=2026-05-15}} | ||
== Z31 Getting Hot Air From AC even when set to cold temps == | == Z31 Getting Hot Air From AC even when set to cold temps == | ||
| Line 14: | Line 14: | ||
* Check the two vacuum lines at the firewall on the passenger side for cracks and leaks. One line goes through the firewall to supply vacuum to the climate control solenoid array, while the other controls the water cock. | * Check the two vacuum lines at the firewall on the passenger side for cracks and leaks. One line goes through the firewall to supply vacuum to the climate control solenoid array, while the other controls the water cock. | ||
[https:// | [https://z31library.com/xenonzcar_archive/z31/images/AC%20repair/heatercock1.jpg https://z31library.com/xenonzcar_archive/z31/images/AC%20repair/heatercocktn.jpg] | ||
There are also three vacuum lines that run back along the fender well to the [https:// | There are also three vacuum lines that run back along the fender well to the [https://z31library.com/xenonzcar_archive/z31/images/AC%20repair/vacuumcanister.jpg vacuum canister]. Inspect all of these lines for cracks and leaks. Replace any that feel hard or brittle. Most lines are color coded: at the canister there is a blue, a white, and a red striped line. Once identified, run new lines and remove the old ones. | ||
* White: Connects the manifold vacuum source to port M on the vacuum tank (should have a built-in one-way valve). | * White: Connects the manifold vacuum source to port M on the vacuum tank (should have a built-in one-way valve). | ||
| Line 24: | Line 24: | ||
Any remaining ports should be plugged. This may or may not fully resolve your issue, but is a critical first step in troubleshooting vacuum problems. | Any remaining ports should be plugged. This may or may not fully resolve your issue, but is a critical first step in troubleshooting vacuum problems. | ||
[https:// | [https://z31library.com/xenonzcar_archive/z31/images/AC%20repair/Vacuumlinesfull.png https://z31library.com/xenonzcar_archive/z31/images/AC%20repair/Vacuumlinessmall.png] | ||
Click image for larger diagram. | Click image for larger diagram. | ||
| Line 30: | Line 30: | ||
==== Defrost Vents are the only ones getting any air and it is hot ==== | ==== Defrost Vents are the only ones getting any air and it is hot ==== | ||
https:// | https://z31library.com/xenonzcar_archive/2025siteimages/actuatorschematic1.png | ||
This issue is becoming more common as these cars age past 40 years. The main causes are vacuum lines running to the actuators that have perished or cracked, or failure of the actuators themselves. The most common actuators to fail are the blend door actuator and the defrost actuator. | This issue is becoming more common as these cars age past 40 years. The main causes are vacuum lines running to the actuators that have perished or cracked, or failure of the actuators themselves. The most common actuators to fail are the blend door actuator and the defrost actuator. | ||
| Line 48: | Line 48: | ||
Actuator: Dorman 604-934 | Actuator: Dorman 604-934 | ||
3D Printed Mount: [https:// | 3D Printed Mount: [https://z31library.com/xenonzcar_archive/2025siteimages/actuator%20mount%201.stl Dorman 604-934 Actuator Mount] | ||
This is the easiest to use and mount—no need to modify the linkage. Simply remove the e-clip from the original actuator and swap it over. The Dorman 604-934 is a 2-stage actuator just like the original. The angle of the door may differ slightly but it should function properly. | This is the easiest to use and mount—no need to modify the linkage. Simply remove the e-clip from the original actuator and swap it over. The Dorman 604-934 is a 2-stage actuator just like the original. The angle of the door may differ slightly but it should function properly. | ||
https:// | https://z31library.com/xenonzcar_archive/2025siteimages/Dorman604-934.jpg | ||
==== Power Servo 1 ==== | ==== Power Servo 1 ==== | ||
Actuator: Dorman 604-922 | Actuator: Dorman 604-922 | ||
3D Printed Mount: [https:// | 3D Printed Mount: [https://z31library.com/xenonzcar_archive/2025siteimages/actuator%20mount%202.stl Dorman 604-922 Actuator Mount] | ||
For installation, saw off the last 2 inches of the actuator, then put a right angle in the bracket and use the existing hole to butt against the hardware. Use the actuator's mounting slots to attach the 3D printed mount. | For installation, saw off the last 2 inches of the actuator, then put a right angle in the bracket and use the existing hole to butt against the hardware. Use the actuator's mounting slots to attach the 3D printed mount. | ||
https:// | https://z31library.com/xenonzcar_archive/2025siteimages/Dorman604-922-1CUT.jpg https://z31library.com/xenonzcar_archive/2025siteimages/Dorman604-922-bracket.jpg | ||
==== Power Servo 2 ==== | ==== Power Servo 2 ==== | ||
Actuator: Dorman 604-933 | Actuator: Dorman 604-933 | ||
3D Printed Mount: [https:// | 3D Printed Mount: [https://z31library.com/xenonzcar_archive/2025siteimages/actuator%20mount%203.stl Dorman 604-933 Actuator Mount] | ||
https:// | https://z31library.com/xenonzcar_archive/2025siteimages/Dorman604-933Mods.png | ||
For this actuator, trim off the plastic mounting features and saw off the end of the linkage. The Dorman 604-933 has more travel than the OEM actuator, so the first half-inch of travel does nothing; the next inch actuates the assembly. Refer to the images below for modifications and mounting. | For this actuator, trim off the plastic mounting features and saw off the end of the linkage. The Dorman 604-933 has more travel than the OEM actuator, so the first half-inch of travel does nothing; the next inch actuates the assembly. Refer to the images below for modifications and mounting. | ||
Latest revision as of 22:54, 20 October 2026
Imported page. This page was converted from an archived copy of "Z31 Getting Hot Air From AC even when set to cold temps" (Xenonzcar, fetched 2026-05-15). The conversion was mechanical, so tables, links and formatting may contain conversion artefacts. Compare against the archived copy if something looks wrong. The content belongs to its original authors.
Z31 Getting Hot Air From AC even when set to cold temps[edit]
On the Z31 300ZX there were two different designs of the Air Conditioning system: a manual system (used on GL models with slider controls for adjustment), and an automatic digital climate control system (offered on GLL models as well as the 50th Anniversary Edition). The digital system uses sensors to monitor and automatically adjust temperature and air flow.
This page discusses common problems and fixes for both systems.
Hot Air From A/C Vents[edit]
Commonly, air flow or temperature control issues are vacuum-related without a single universal cause or fix.
- Any leak in the vacuum system can cause not only heating and air conditioning issues, but also engine performance problems.
- Check the two vacuum lines at the firewall on the passenger side for cracks and leaks. One line goes through the firewall to supply vacuum to the climate control solenoid array, while the other controls the water cock.
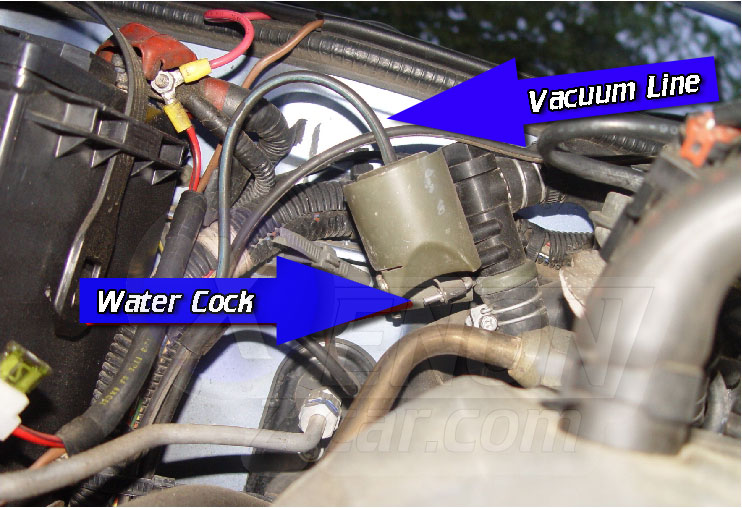
There are also three vacuum lines that run back along the fender well to the vacuum canister. Inspect all of these lines for cracks and leaks. Replace any that feel hard or brittle. Most lines are color coded: at the canister there is a blue, a white, and a red striped line. Once identified, run new lines and remove the old ones.
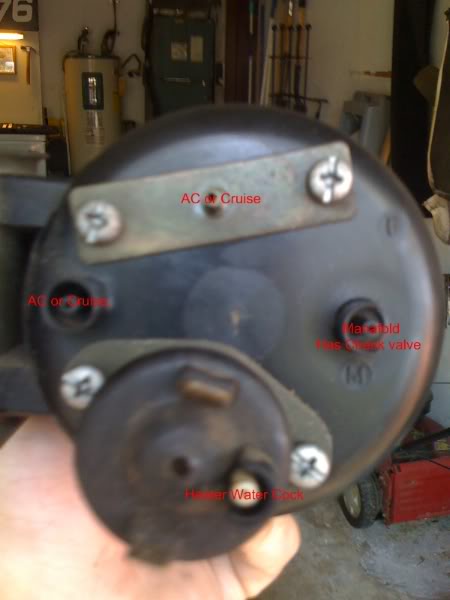
- White: Connects the manifold vacuum source to port M on the vacuum tank (should have a built-in one-way valve).
- Blue: Runs between the water cock and the magnet valve on the vacuum tank.
- Red: Goes between the interior door controls and a live feed from the tank, sometimes labeled as "F".
Any remaining ports should be plugged. This may or may not fully resolve your issue, but is a critical first step in troubleshooting vacuum problems.
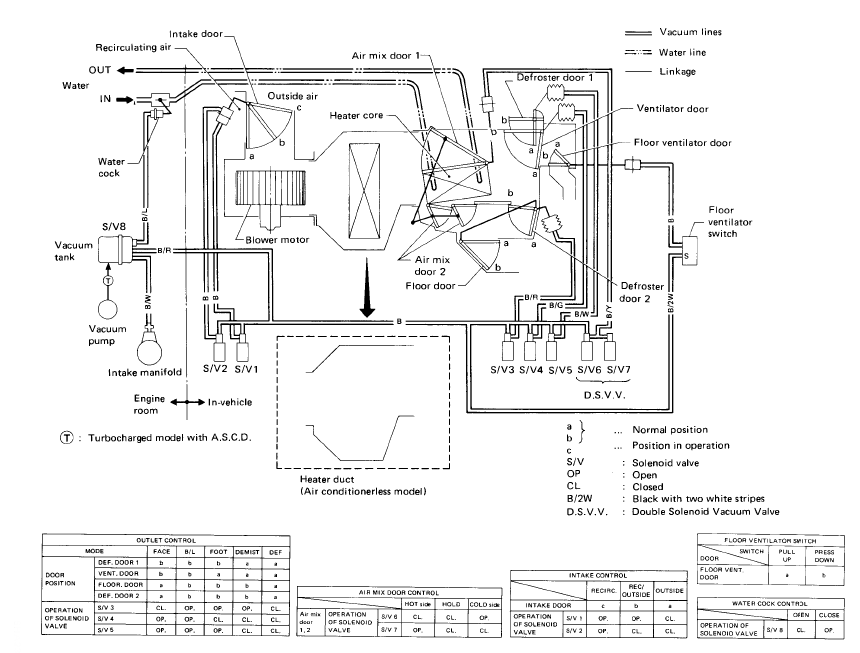
Click image for larger diagram.
Defrost Vents are the only ones getting any air and it is hot[edit]
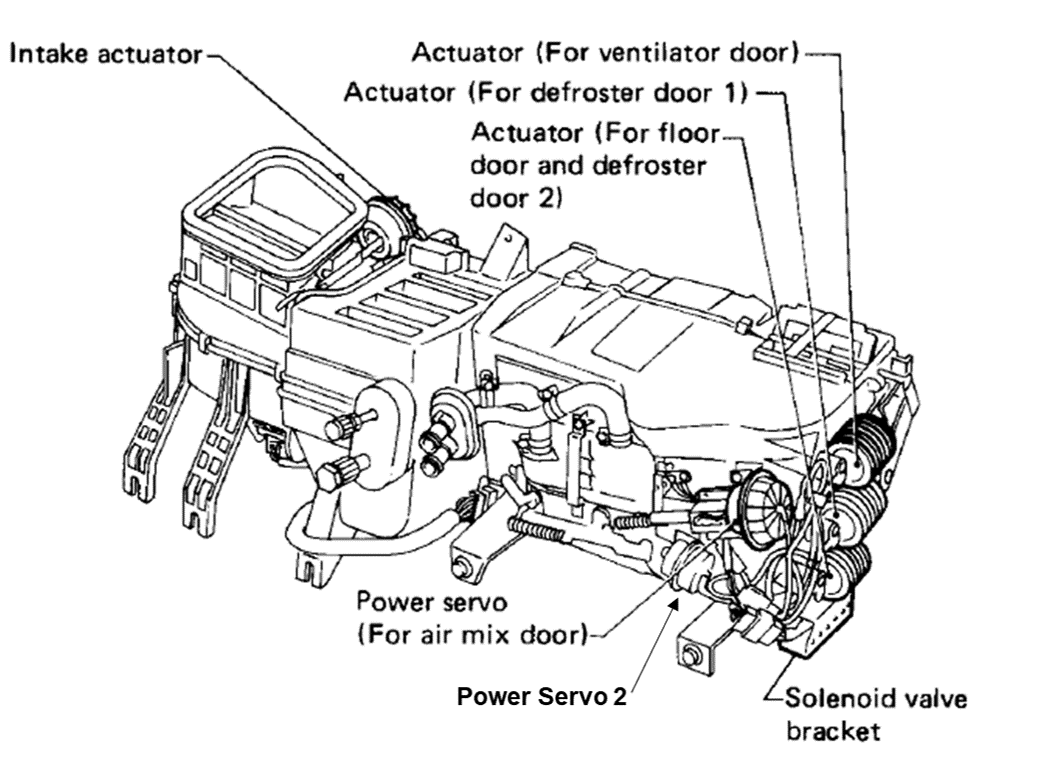
This issue is becoming more common as these cars age past 40 years. The main causes are vacuum lines running to the actuators that have perished or cracked, or failure of the actuators themselves. The most common actuators to fail are the blend door actuator and the defrost actuator.
Unfortunately, these are also the most difficult to access, as they're mounted on the back of the heater box, buried deep in the dash. This means the entire dash and heater core need to be removed for replacement. From experience, the smaller actuator on the back (blend door actuator) is especially hard to source.
However, you can use aftermarket actuators as replacements with the help of 3D printing for brackets or adapters. Thanks to Nick Sturgis for developing a process that makes this possible.
Parts Needed[edit]
- Dorman OE Solutions 604-922 — Vacuum Style Air Actuator
- Dorman 604-933 — Vacuum Style Air Door Actuator
- Dorman 604-934 — Vacuum Style Air Door Actuator
- Full Actuator Mounting Kit (3d Printed)
Intake Actuator[edit]
Actuator: Dorman 604-934 3D Printed Mount: Dorman 604-934 Actuator Mount
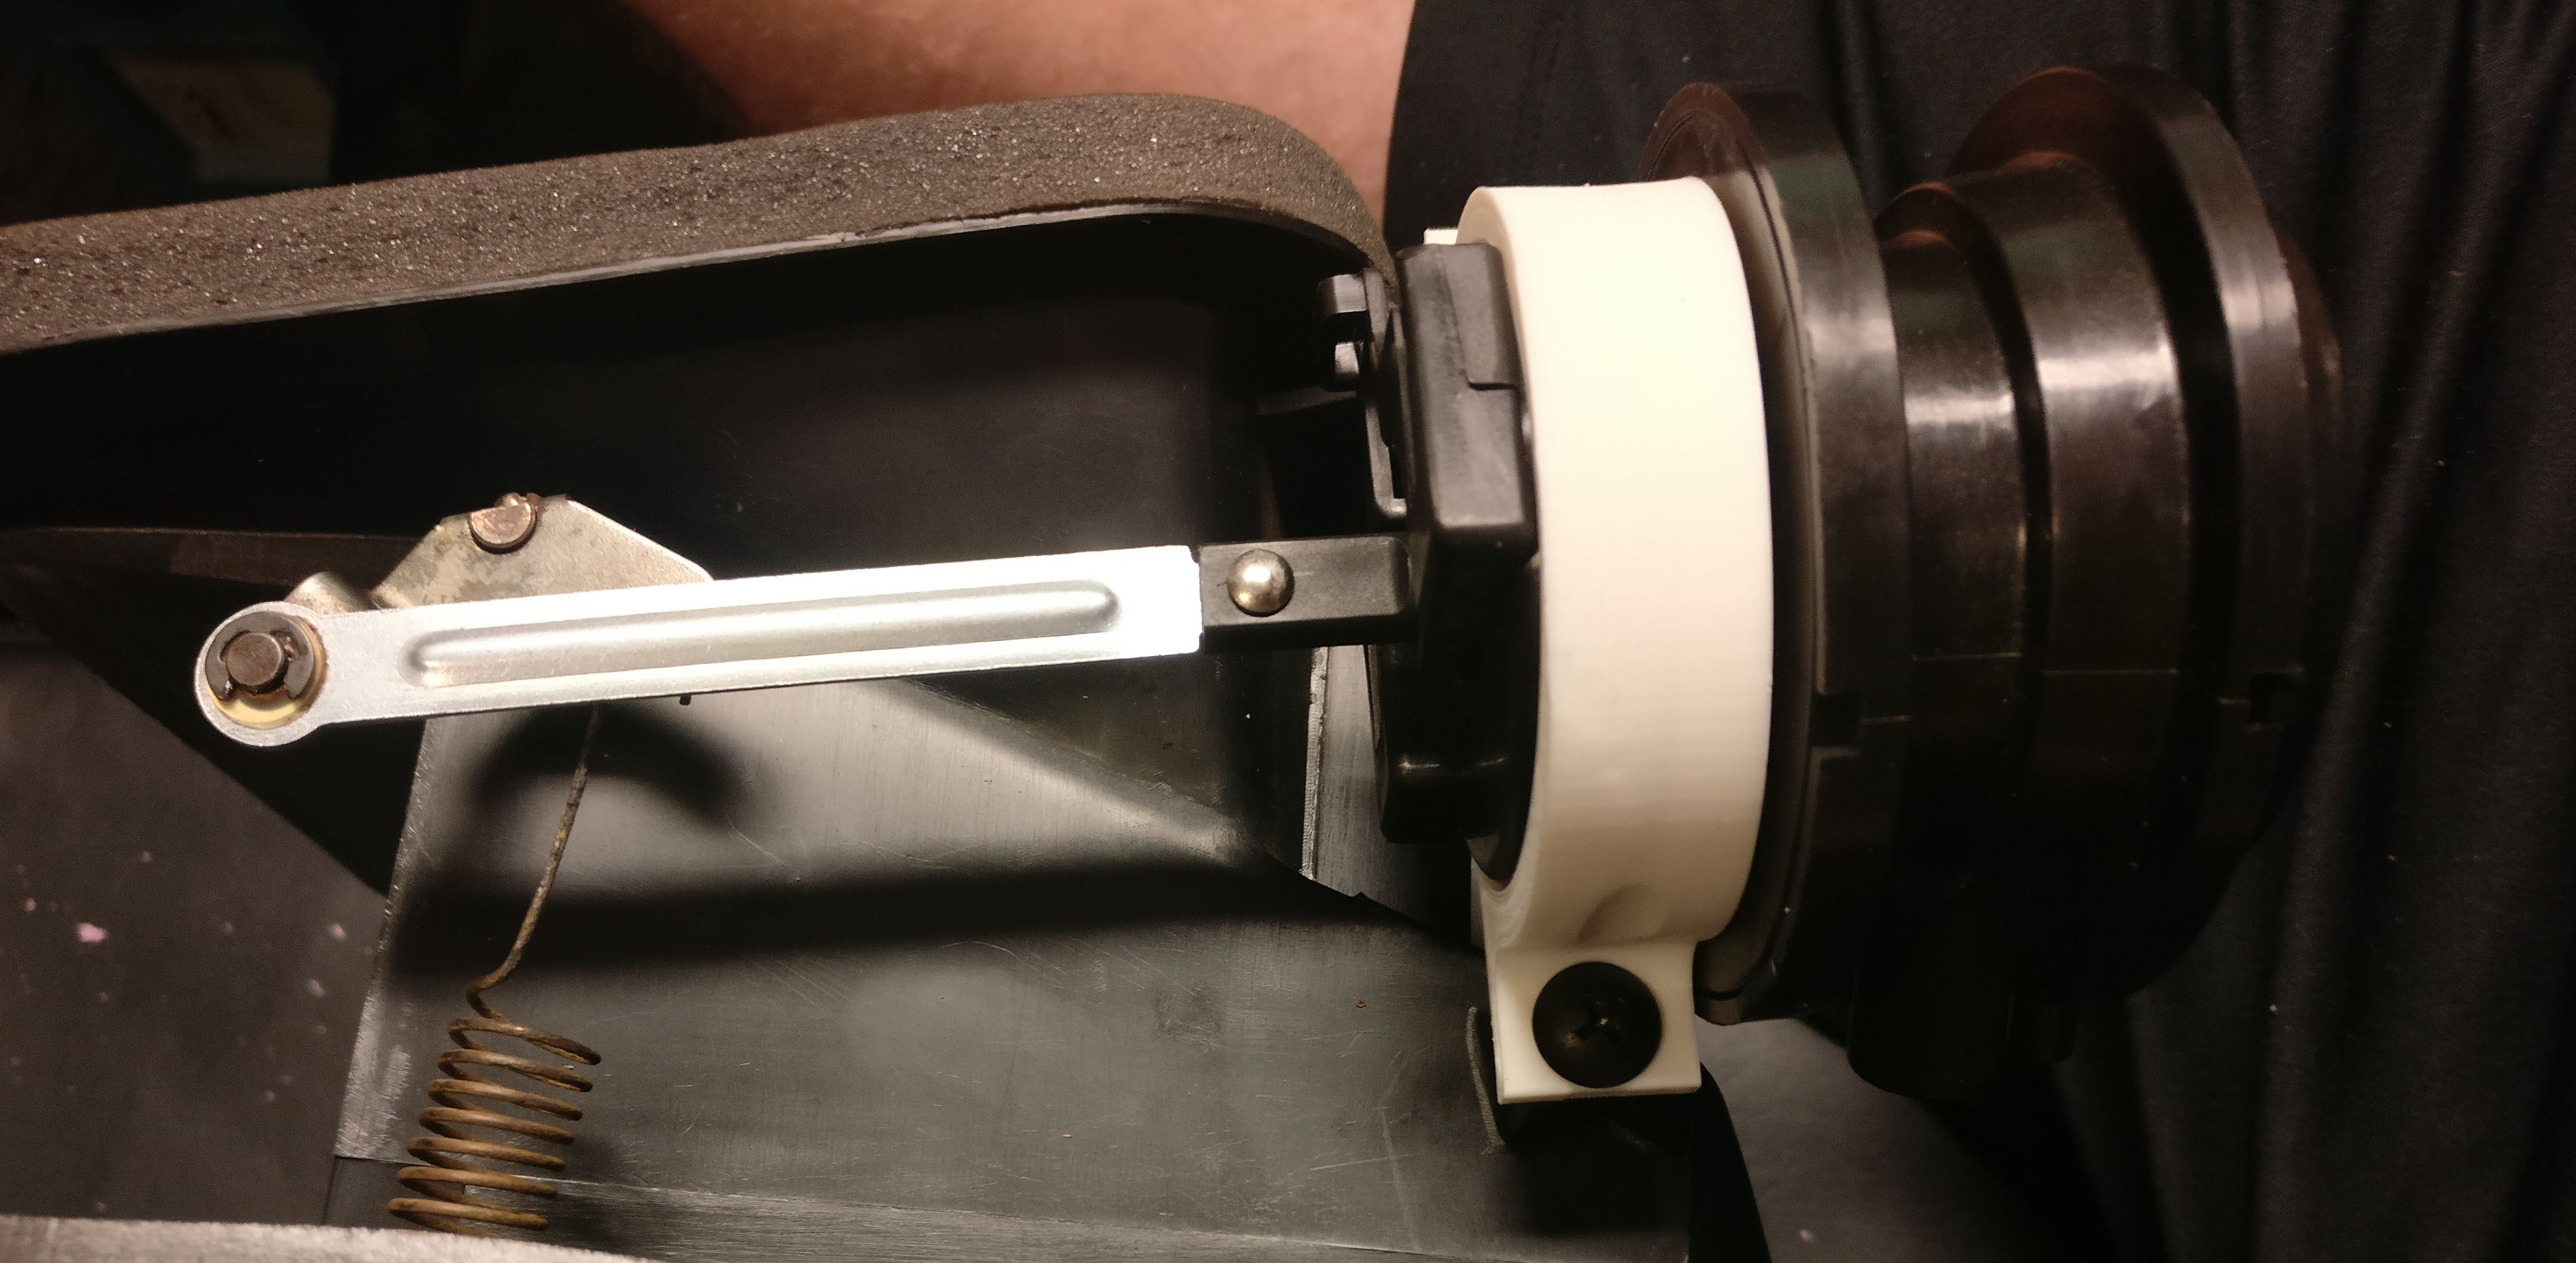
This is the easiest to use and mount—no need to modify the linkage. Simply remove the e-clip from the original actuator and swap it over. The Dorman 604-934 is a 2-stage actuator just like the original. The angle of the door may differ slightly but it should function properly.
Power Servo 1[edit]
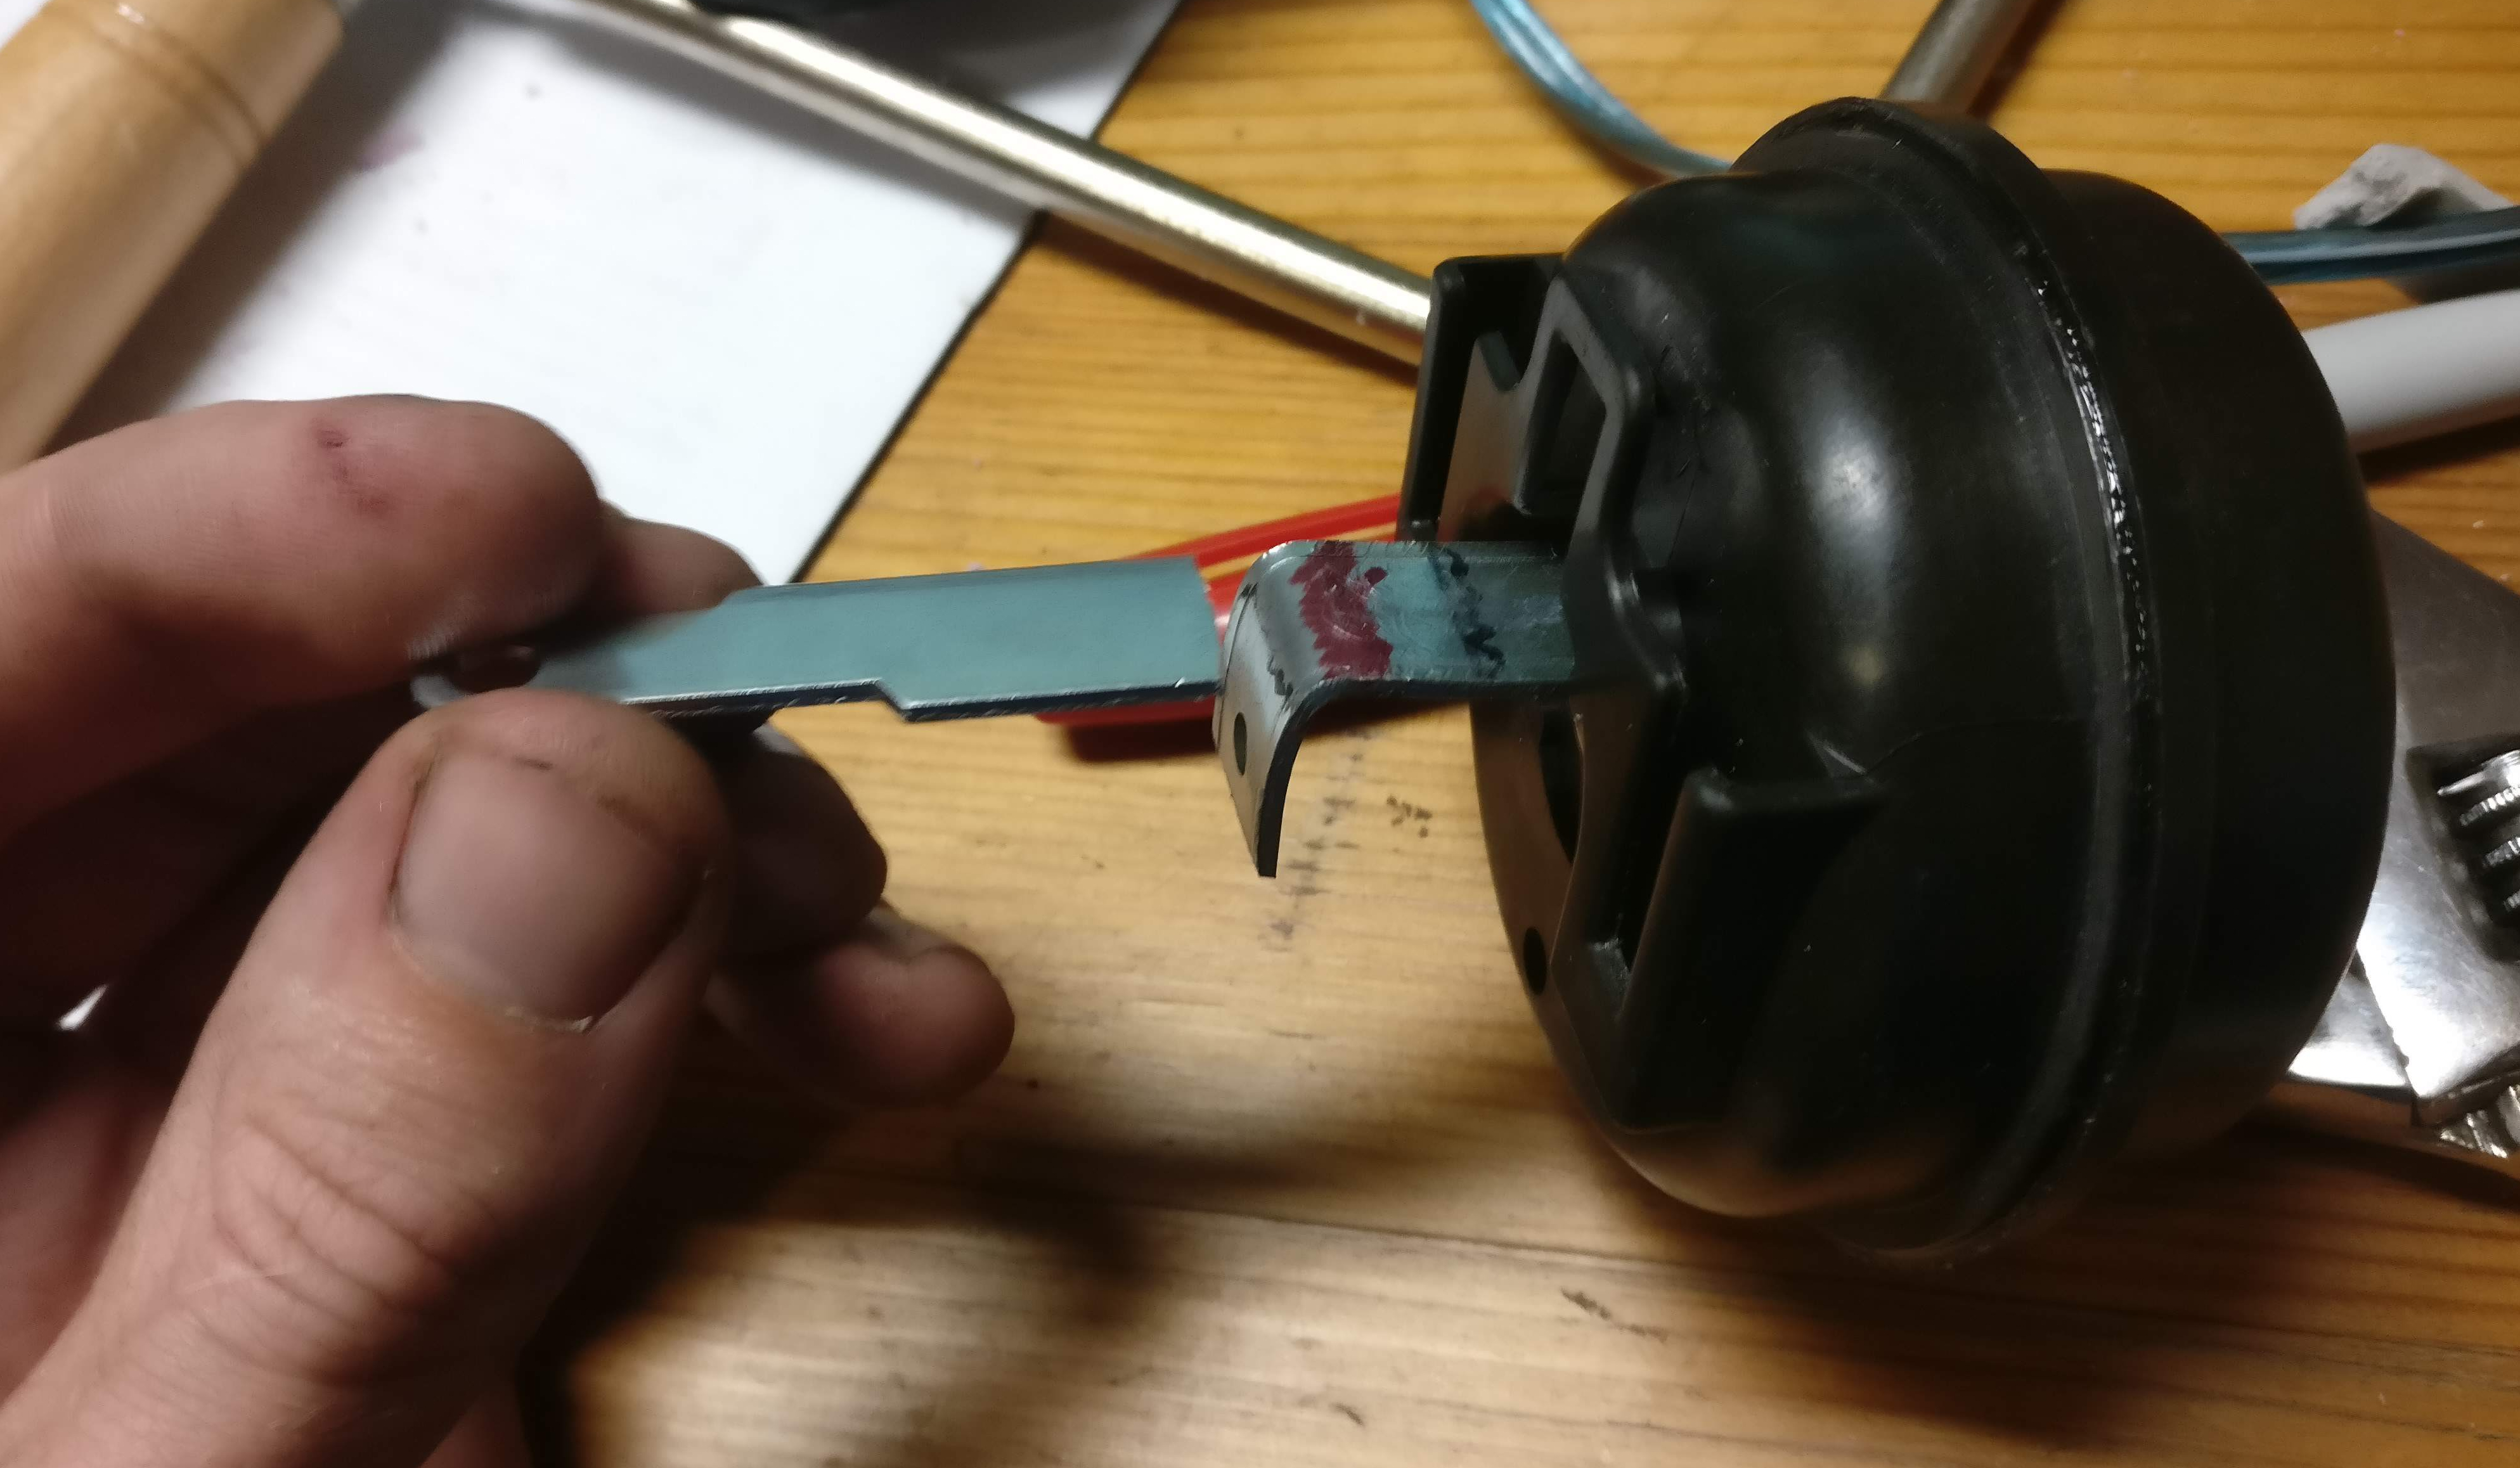
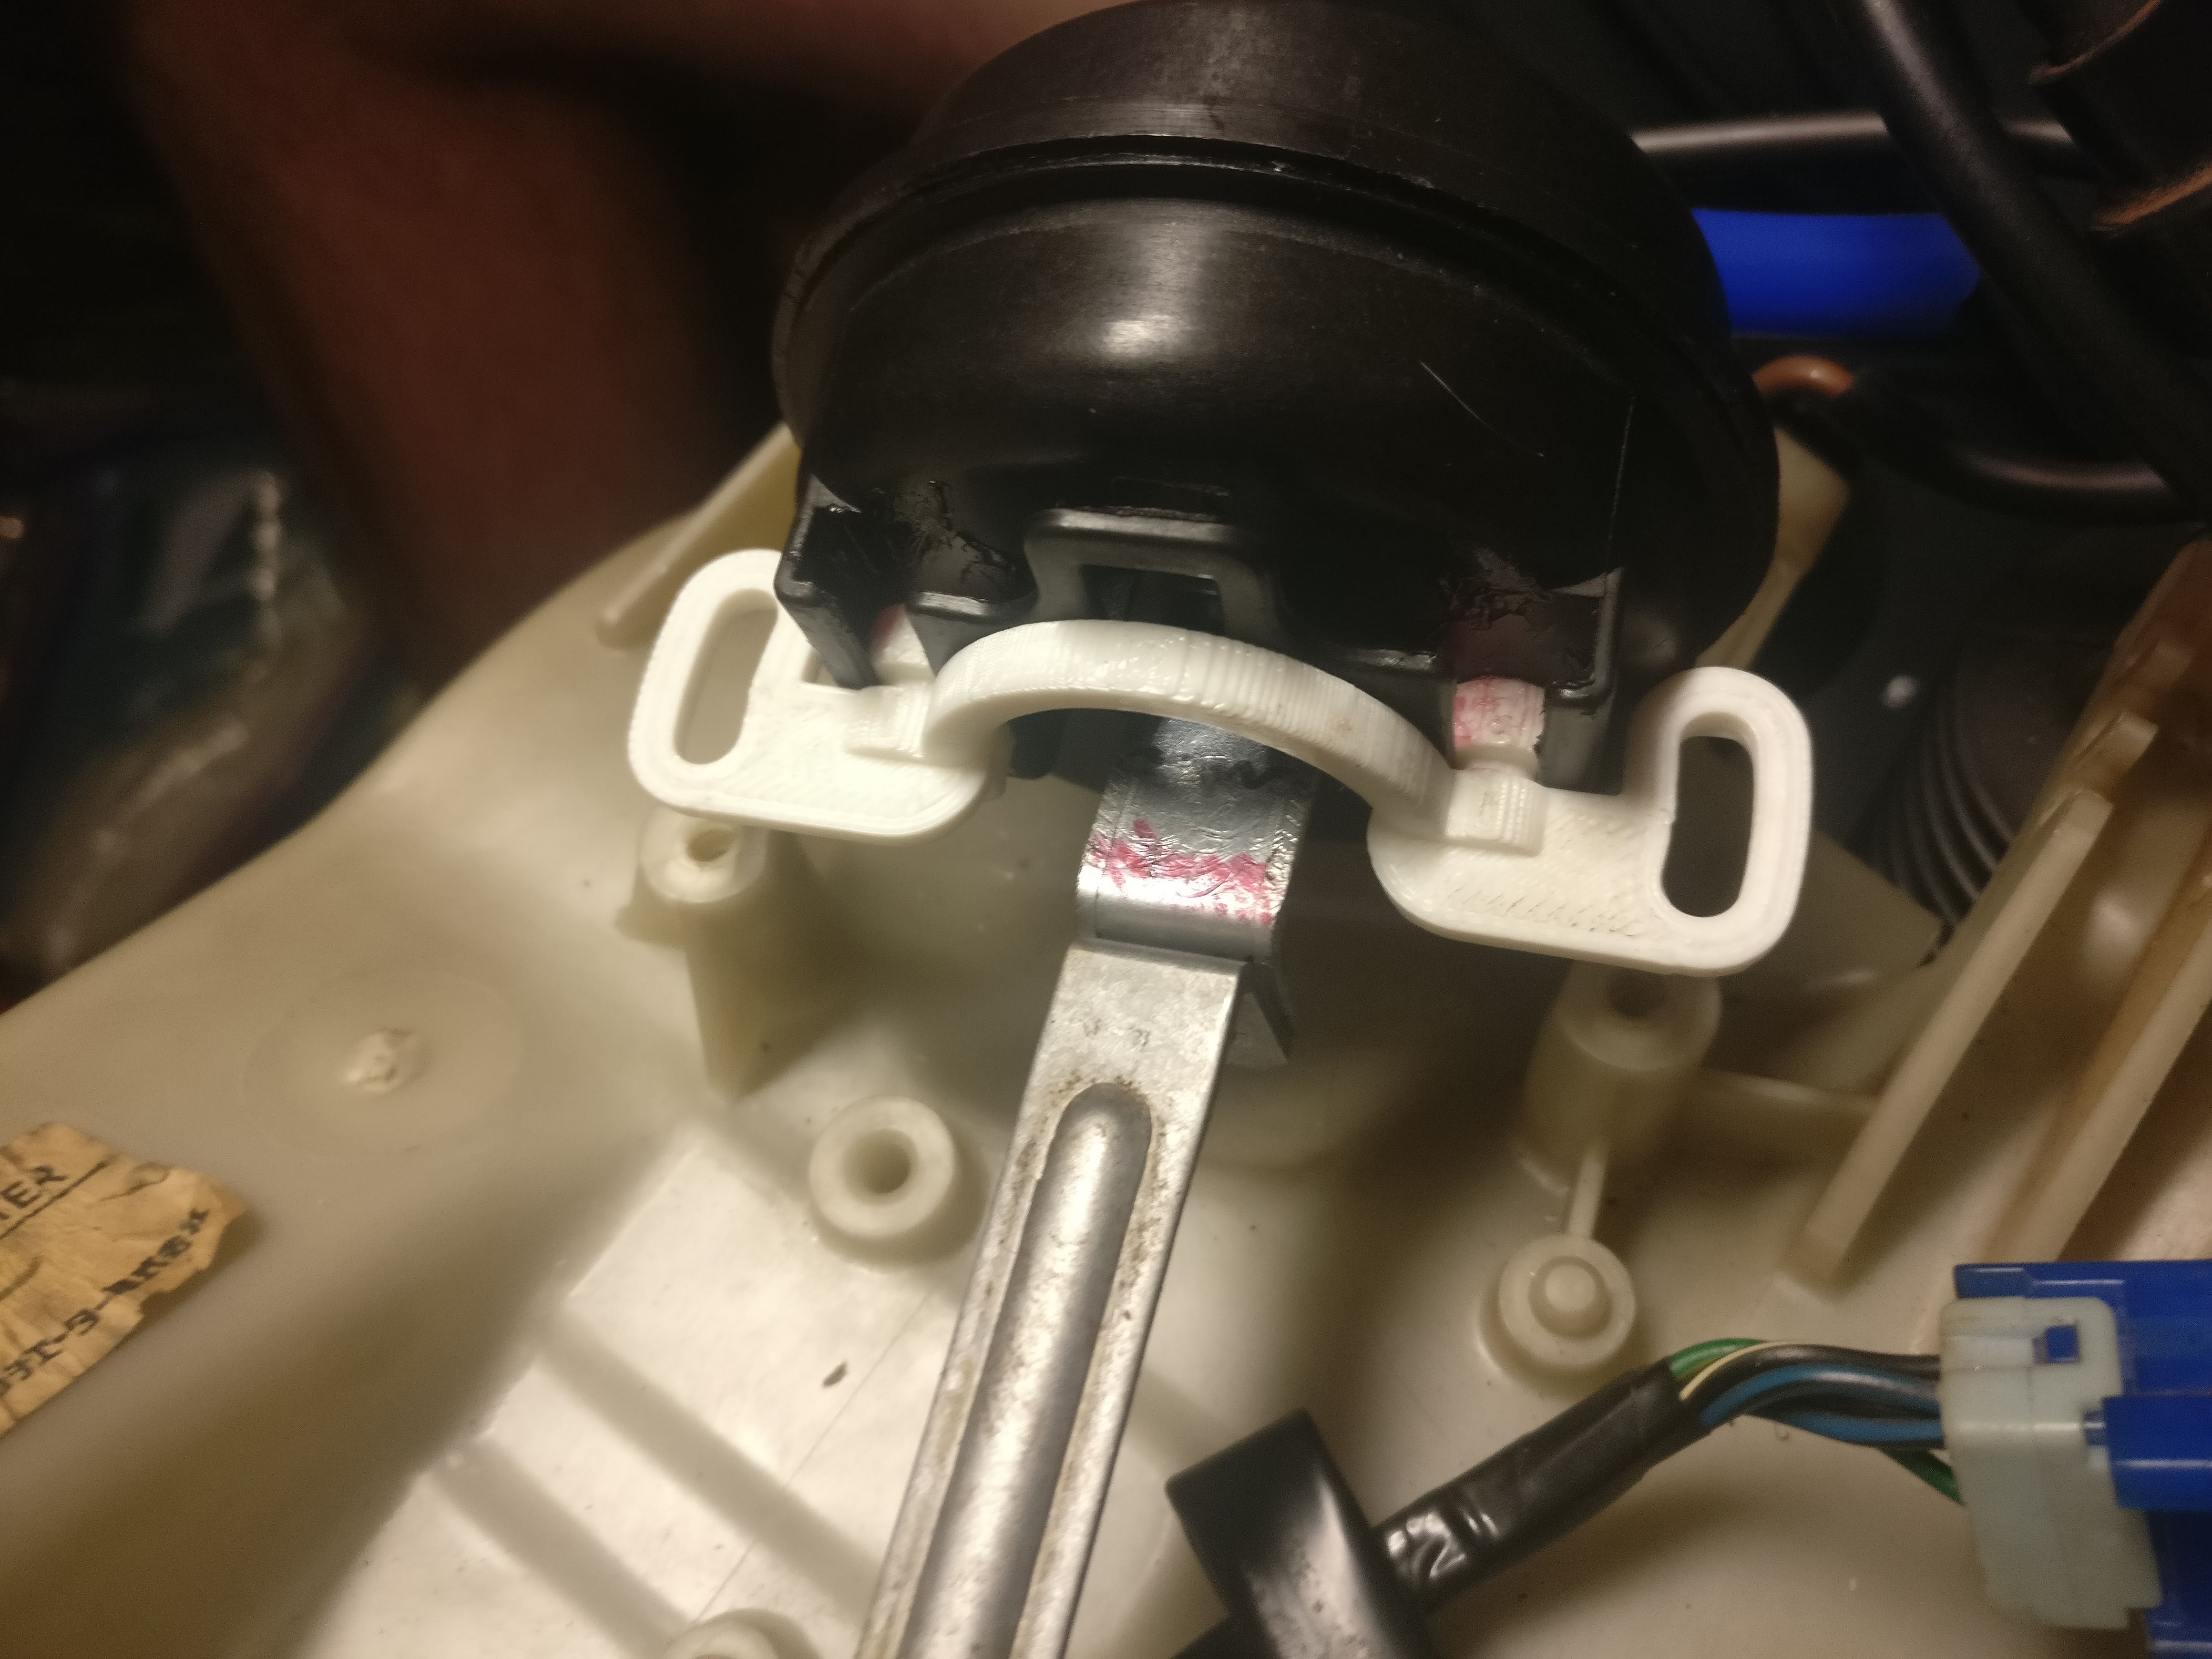
Actuator: Dorman 604-922 3D Printed Mount: Dorman 604-922 Actuator Mount
For installation, saw off the last 2 inches of the actuator, then put a right angle in the bracket and use the existing hole to butt against the hardware. Use the actuator's mounting slots to attach the 3D printed mount.
Power Servo 2[edit]
Actuator: Dorman 604-933 3D Printed Mount: Dorman 604-933 Actuator Mount
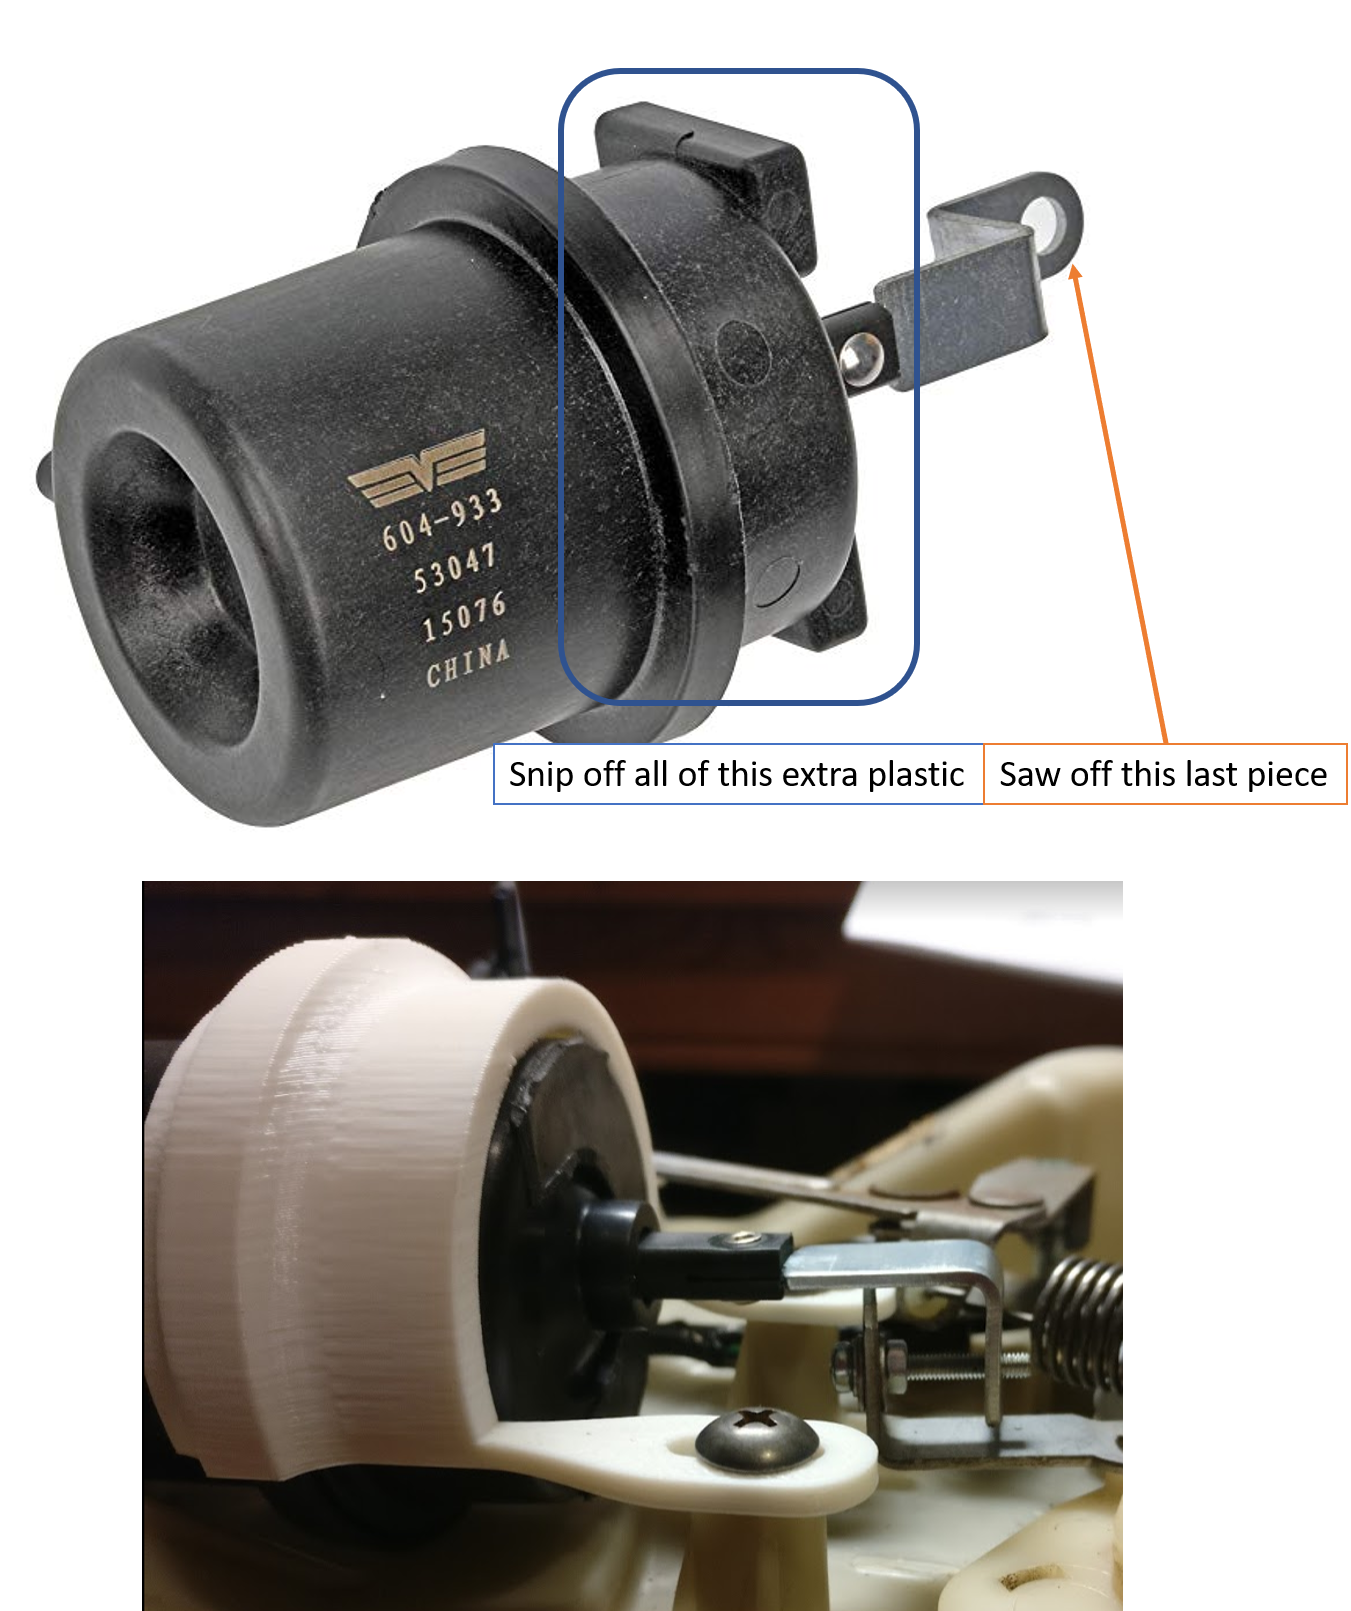
For this actuator, trim off the plastic mounting features and saw off the end of the linkage. The Dorman 604-933 has more travel than the OEM actuator, so the first half-inch of travel does nothing; the next inch actuates the assembly. Refer to the images below for modifications and mounting.
Sources Used[edit]
- 1984-1988 Nissan 300ZX Factory Service Manual
- Vacuum Line section Written by: Frank Zemaitis,
- Water Cock Image by: PulseCode of Z31performance.com
- Vent Control Door Repair Written by: Nick Sturgis