
Z31/SENSORS/aac php: Difference between revisions
m XenonzcarImporter moved page Sites/Xenonzcar/z31/SENSORS/aac php to Z31/SENSORS/aac php without leaving a redirect: Flatten Sites/ namespace; provenance preserved via ImportedFrom banner |
CleanupBot (talk | contribs) Rewrite 4 dev.z31library.com link(s) to z31library.com |
||
| (2 intermediate revisions by 2 users not shown) | |||
| Line 1: | Line 1: | ||
{{ImportedFrom|site=Xenonzcar|title=Z31 (A.A.C.) Auxiliary Air Control Valve (Turbo Only)|url= | {{ImportedFrom|site=Xenonzcar|title=Z31 (A.A.C.) Auxiliary Air Control Valve (Turbo Only)|url=https://z31library.com/xenonzcar_archive/z31/SENSORS/aac.php.html|archive=https://z31library.com/xenonzcar_archive/z31/SENSORS/aac.php.html|fetched=2026-05-15}} | ||
== Z31 (A.A.C.) Auxiliary Air Control Valve (Turbo Only) == | == Z31 (A.A.C.) Auxiliary Air Control Valve (Turbo Only) == | ||
| Line 5: | Line 5: | ||
The '''AAC (Auxiliary Air Control) Valve''' is attached to the right side of the intake manifold. The ECU actuates the AAC valve by an '''ON/OFF pulse'''. The longer the ON duty is left on, the larger the amount of air that will flow through the AAC valve. | The '''AAC (Auxiliary Air Control) Valve''' is attached to the right side of the intake manifold. The ECU actuates the AAC valve by an '''ON/OFF pulse'''. The longer the ON duty is left on, the larger the amount of air that will flow through the AAC valve. | ||
https://z31library.com/xenonzcar_archive/z31/images/Sensors/AACvalve.gif | |||
''WARNING | ''' | ||
*WARNING* - Do this modification at your own risk. We Are not responsable for any issues of your own doing. | |||
''' | |||
=== Common Problems === | === Common Problems === | ||
| Line 19: | Line 23: | ||
To test the AAC valve, follow these steps: | To test the AAC valve, follow these steps: | ||
https://z31library.com/xenonzcar_archive/z31/images/Sensors/AACtroubleshootingfull.png | |||
# Refer to the diagram above for proper test points. | |||
# Check for correct voltage and resistance as shown. | |||
# Inspect wiring and connector for corrosion or breaks. | |||
# If the valve does not function, it may need cleaning or replacement. | |||
=== Sources Used === | |||
* | * [[Z31/z31fsm php|1984-1988 Nissan 300ZX Factory Service Manual]] | ||
[[Category:Imported from Xenonzcar]] | [[Category:Imported from Xenonzcar]] | ||
Latest revision as of 22:53, 20 October 2026
Imported page. This page was converted from an archived copy of "Z31 (A.A.C.) Auxiliary Air Control Valve (Turbo Only)" (Xenonzcar, fetched 2026-05-15). The conversion was mechanical, so tables, links and formatting may contain conversion artefacts. Compare against the archived copy if something looks wrong. The content belongs to its original authors.
Z31 (A.A.C.) Auxiliary Air Control Valve (Turbo Only)[edit]
The AAC (Auxiliary Air Control) Valve is attached to the right side of the intake manifold. The ECU actuates the AAC valve by an ON/OFF pulse. The longer the ON duty is left on, the larger the amount of air that will flow through the AAC valve.
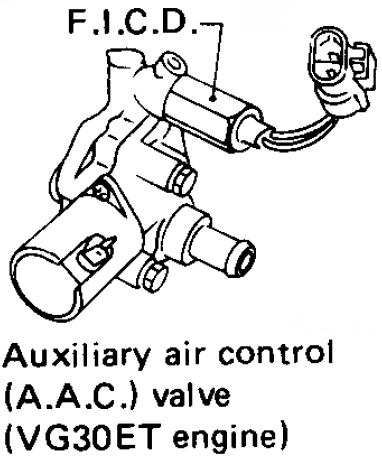
- WARNING* - Do this modification at your own risk. We Are not responsable for any issues of your own doing.
Common Problems[edit]
- Idle issues or surging
- Valve sticking or not actuating
- Electrical connector or wiring faults
Troubleshooting[edit]
To test the AAC valve, follow these steps:
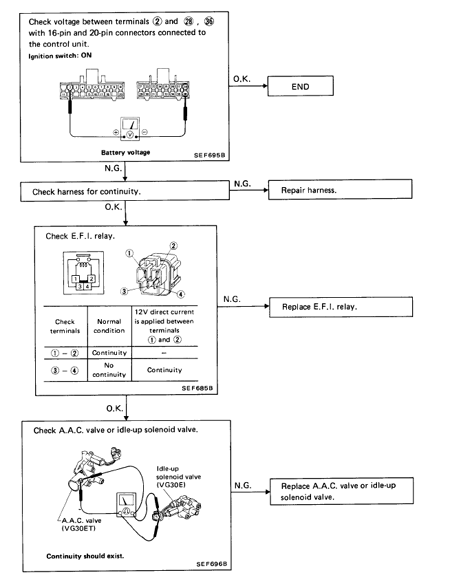
- Refer to the diagram above for proper test points.
- Check for correct voltage and resistance as shown.
- Inspect wiring and connector for corrosion or breaks.
- If the valve does not function, it may need cleaning or replacement.