
Z31/stockspoilerinstall php: Difference between revisions
CleanupBot (talk | contribs) Residue cleanup: re-convert body verbatim from archived source; removes duplicated copy of body |
CleanupBot (talk | contribs) m Rewrite 9 dev.z31library.com link(s) to z31library.com |
||
| Line 1: | Line 1: | ||
{{ImportedFrom|site=Xenonzcar|title=Z31 Stock Spoiler install on a car that was not equipped with a spoiler|url=https:// | {{ImportedFrom|site=Xenonzcar|title=Z31 Stock Spoiler install on a car that was not equipped with a spoiler|url=https://z31library.com/xenonzcar_archive/z31/stockspoilerinstall.php.html|archive=https://z31library.com/xenonzcar_archive/z31/stockspoilerinstall.php.html|fetched=2026-05-15}} | ||
== Z31 Stock Spoiler install on a car that was not equipped with a spoiler == | == Z31 Stock Spoiler install on a car that was not equipped with a spoiler == | ||
| Line 5: | Line 5: | ||
If you have a 1984-1985 or 1987-1989 Non-Turbo 300ZX, you know that a rear spoiler was not available from the factory. A great upgrade for these models is to add the Turbo spoiler for a more aggressive look and improved style. | If you have a 1984-1985 or 1987-1989 Non-Turbo 300ZX, you know that a rear spoiler was not available from the factory. A great upgrade for these models is to add the Turbo spoiler for a more aggressive look and improved style. | ||
https:// | https://z31library.com/xenonzcar_archive/z31/images/Spolier%20install/DSCF0272.jpg | ||
''' | ''' | ||
| Line 25: | Line 25: | ||
The first thing you may want to do is clean up your spoiler. If you have a '''1984-1985''' spoiler, it is made of foam rubber with a metal supporting structure. The '''1986''' model is fiberglass and has a 3rd brake light built in, so wiring will be needed. The '''1987-1989''' model spoilers are also fiberglass but do not have the brake light. | The first thing you may want to do is clean up your spoiler. If you have a '''1984-1985''' spoiler, it is made of foam rubber with a metal supporting structure. The '''1986''' model is fiberglass and has a 3rd brake light built in, so wiring will be needed. The '''1987-1989''' model spoilers are also fiberglass but do not have the brake light. | ||
https:// | https://z31library.com/xenonzcar_archive/z31/images/Spolier%20install/DSCF0261.jpg | ||
The only 2+2 with a spoiler in the US was the 1986 model. However, they will fit all other year 2+2 cars. | The only 2+2 with a spoiler in the US was the 1986 model. However, they will fit all other year 2+2 cars. | ||
| Line 31: | Line 31: | ||
To locate the holes to drill, roll small pieces of duct tape on each stud of the spoiler. | To locate the holes to drill, roll small pieces of duct tape on each stud of the spoiler. | ||
https:// | https://z31library.com/xenonzcar_archive/z31/images/Spolier%20install/DSCF0264.jpg | ||
Doing this will transfer the tape onto the hatch lid, leaving small circle indentations showing exactly where to drill the holes. | Doing this will transfer the tape onto the hatch lid, leaving small circle indentations showing exactly where to drill the holes. | ||
https:// | https://z31library.com/xenonzcar_archive/z31/images/Spolier%20install/DSCF0267.jpg | ||
Carefully center punch the location and then drill the holes. | Carefully center punch the location and then drill the holes. | ||
https:// | https://z31library.com/xenonzcar_archive/z31/images/Spolier%20install/DSCF0268.jpg | ||
On the underside of the hatch, you will also need to drill two 5/8" holes to access the two inner studs. | On the underside of the hatch, you will also need to drill two 5/8" holes to access the two inner studs. | ||
https:// | https://z31library.com/xenonzcar_archive/z31/images/Spolier%20install/DSCF0269.jpg | ||
Tighten the spoiler down and enjoy! | Tighten the spoiler down and enjoy! | ||
https:// | https://z31library.com/xenonzcar_archive/z31/images/Spolier%20install/DSCF0271.jpg | ||
=== Sources Used === | === Sources Used === | ||
Latest revision as of 22:55, 20 October 2026
Imported page. This page was converted from an archived copy of "Z31 Stock Spoiler install on a car that was not equipped with a spoiler" (Xenonzcar, fetched 2026-05-15). The conversion was mechanical, so tables, links and formatting may contain conversion artefacts. Compare against the archived copy if something looks wrong. The content belongs to its original authors.
Z31 Stock Spoiler install on a car that was not equipped with a spoiler[edit]
If you have a 1984-1985 or 1987-1989 Non-Turbo 300ZX, you know that a rear spoiler was not available from the factory. A great upgrade for these models is to add the Turbo spoiler for a more aggressive look and improved style.
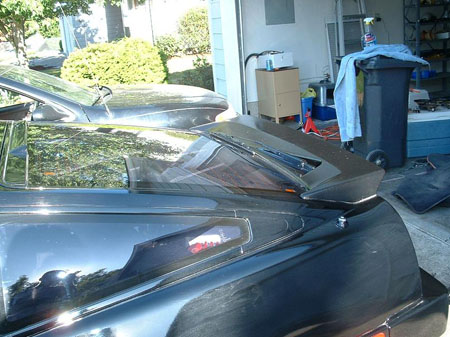
- WARNING* - Do this modification at your own risk. We Are not responsable for any issues of your own doing.
Tools and Parts Needed[edit]
- Spoiler
- 5/8" drill bit
- Drill
- Tape
- Spoiler gasket
=== Installation/h2>
The first thing you may want to do is clean up your spoiler. If you have a 1984-1985 spoiler, it is made of foam rubber with a metal supporting structure. The 1986 model is fiberglass and has a 3rd brake light built in, so wiring will be needed. The 1987-1989 model spoilers are also fiberglass but do not have the brake light.
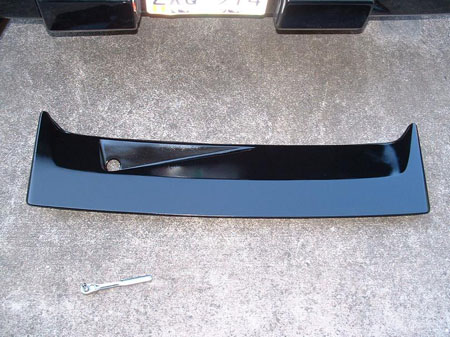
The only 2+2 with a spoiler in the US was the 1986 model. However, they will fit all other year 2+2 cars.
To locate the holes to drill, roll small pieces of duct tape on each stud of the spoiler.
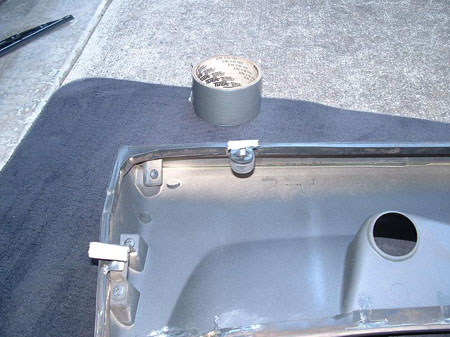
Doing this will transfer the tape onto the hatch lid, leaving small circle indentations showing exactly where to drill the holes.
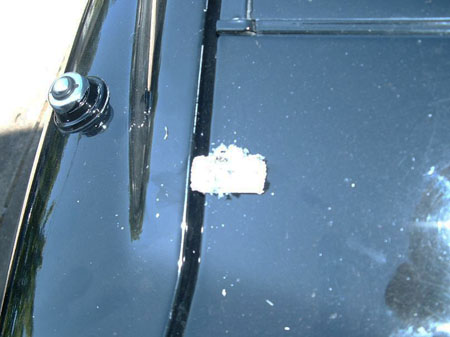
Carefully center punch the location and then drill the holes.
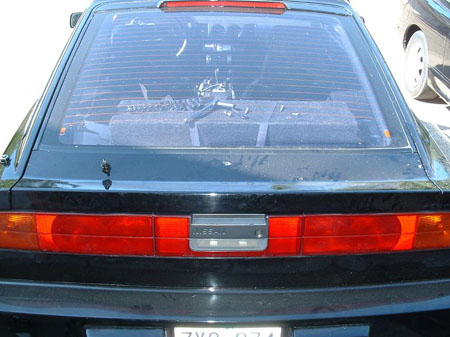
On the underside of the hatch, you will also need to drill two 5/8" holes to access the two inner studs.
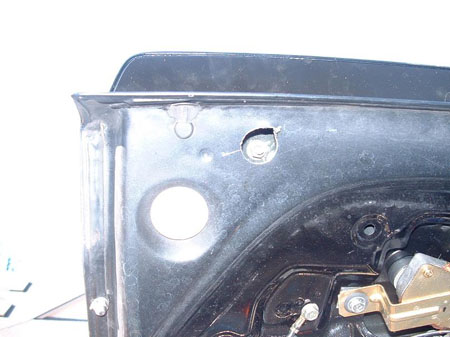
Tighten the spoiler down and enjoy!
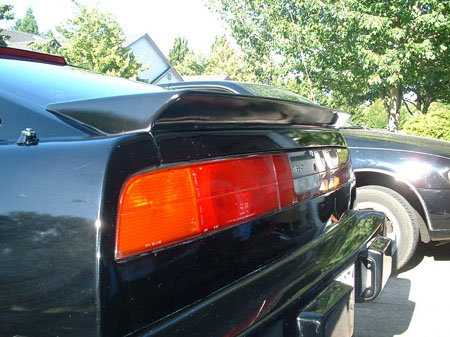
Sources Used[edit]
- 1984-1988 Nissan 300ZX Factory Service Manual
- Images and Write-up By : Amreboot